Shadowrocket Setup Guide
Import your details → choose Global Routing → authorize the connection → verify access. First establish a reproducible connection, then adjust rules and settings.
Jump directly to the step where you are stuck. For your first setup, follow the steps in order and keep your existing settings for now. This makes it easier to identify the cause if you change the server, rules, and DNS all at once.
01 / IMPORT
Add a server or Subscribe
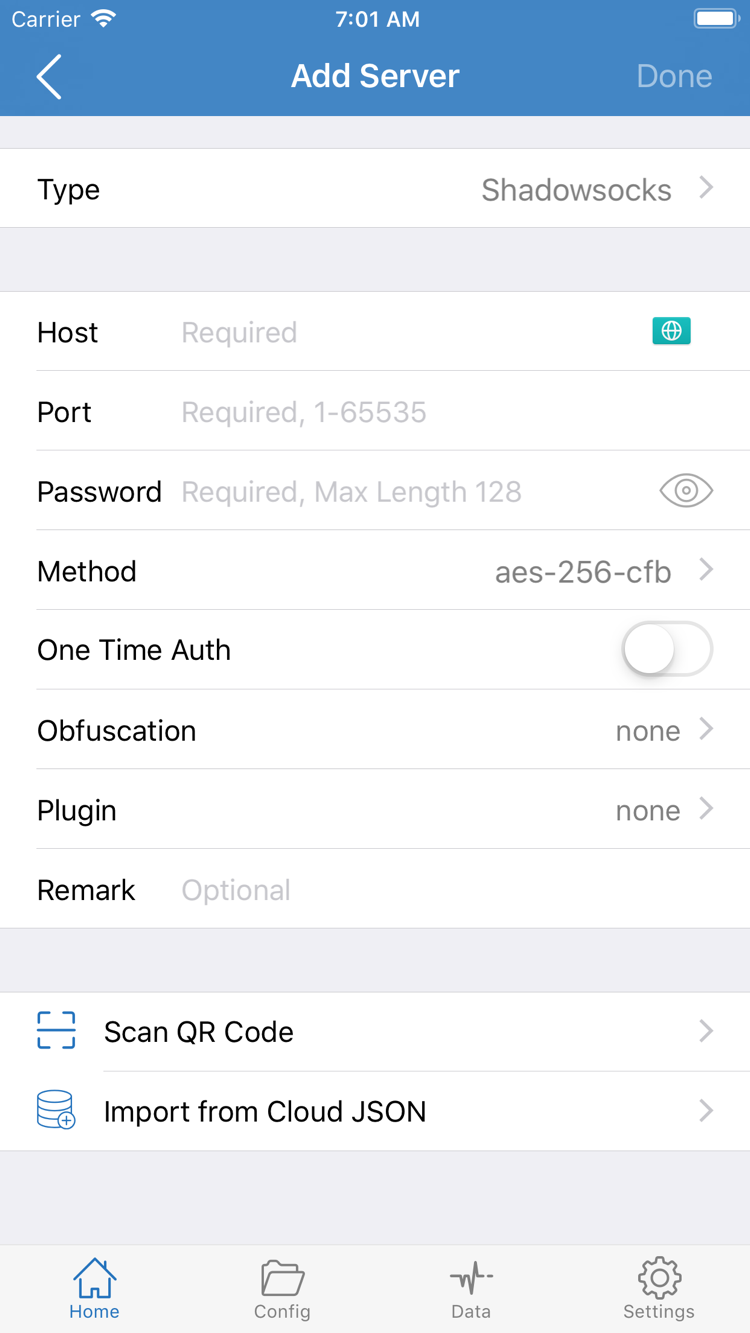
First identify which type of details you have. A subscription link is generally used to import and update a group of entries; individual server details include the protocol, address, port, and authentication parameters. Choose either method; there is no need to add the same server group repeatedly. Open Shadowrocket, go to Home, and select Add Server. The fields on the page vary with Type. The fields shown in the screenshot apply only to the displayed type; not all protocols use the same parameters.
Existing subscription link
In Add Server, open Type and choose Subscribe. Enter your complete subscription link in URL, add a note to identify it, and save. When copying the link, check its beginning, end, and query parameters. Avoid including explanatory text from a chat message, spaces, or line breaks. A subscription link may contain access credentials, so do not include the full link in a public screenshot or send it to unrelated pages.
After saving and retrieving the subscription, return to Home and check its group and server entries. If the group appears without selectable entries, first check whether the subscription was retrieved successfully, then retry using the update action provided by that group. Do not immediately switch to manual entry. A failed update and a server connection failure are different issues: the former may mean the link could not be read or its contents were invalid, while the latter requires checking server parameters. The update option may vary in the current app interface.
Existing individual server details
For manual entry, first select the correct Type for your details, then fill in Host, Port, and the authentication fields required by that protocol. Enter a domain or address in Host; do not use a complete web link as the hostname. Enter the Port from your details rather than guessing from the protocol name. If the page has Password or Method fields, match them to your existing details. For types such as VLESS, VMess, and Trojan, also check the relevant authentication, transport, and TLS settings. Do not copy the field combination in a screenshot without checking.
If your details are in a QR code, use Scan QR Code, allow camera access if needed, and scan it. Import from Cloud JSON is for the corresponding data format, not a general-purpose entry point for any subscription link. Whichever method you use, return to Home after saving, select the intended entry under SERVER, and confirm the selection indicator. An entry appearing means the import is complete; it does not prove the connection works. Next, choose how requests should be handled, then turn on the connection switch.
02 / ROUTING
Choose Global Routing
Return to Home and open Global Routing. This setting determines whether requests use rules, use the proxy by default, or connect directly. It is separate from the server selected under SERVER. Understand the three modes before choosing one for your current purpose. This helps avoid assuming that every request uses the proxy just because a server is selected.
Config handles requests according to the rules in the currently enabled configuration. Rules can direct different destinations to PROXY, DIRECT, or another configured policy, so not every page should use the proxy. Proxy sends general requests through the current proxy path and can help temporarily isolate variables introduced by rule-based routing. Local network and system behavior still have their own limits, so this should not be taken as an absolute guarantee for all system traffic. Direct accesses destinations directly and cannot be used to verify whether the selected server works.
How Config relates to rules
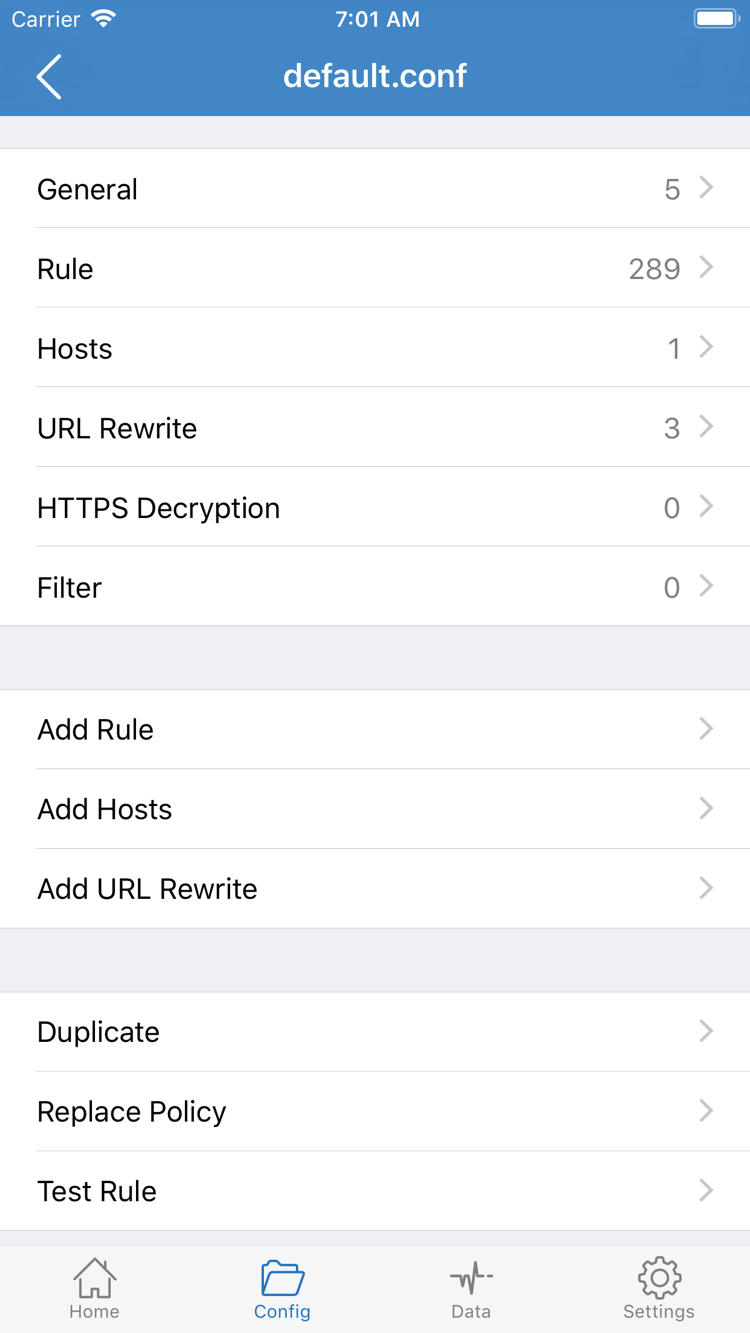
For everyday rule-based use, choose Config, then open Config in the bottom navigation and check which configuration file is enabled. Open the relevant file to see sections such as General, Rule, and Hosts. The screenshot shows configuration content for editing; it does not mean you need to change each item on your first use. Add Rule adds a rule. First confirm that the correct file is selected, then decide whether it needs editing. A file being present does not mean its rules are active.
Rules are usually matched from top to bottom, and the first matching rule determines how a request is handled. For example, the snippet below sends the example domain to PROXY and handles unmatched requests with FINAL. It illustrates the order; it is not an instruction to overwrite your existing configuration. Real configurations may also reference named policies, so keep a copy of the original file before editing. If you do not understand a rule yet, do not delete an entire section just to complete your first connection.
[Rule]
DOMAIN-SUFFIX,example.com,PROXY
FINAL,DIRECT
If you are only checking whether your server details can connect, temporarily choose Proxy, note the original mode, and restore Config after testing. If Proxy works but Config does not, check which rules match and which configuration is selected rather than reinstalling the app or importing the subscription again. See the FAQ for more on rule keywords and routing modes. Once you have chosen a mode, return to Home to connect.
03 / CONNECT
Turn on the switch and authorize the connection
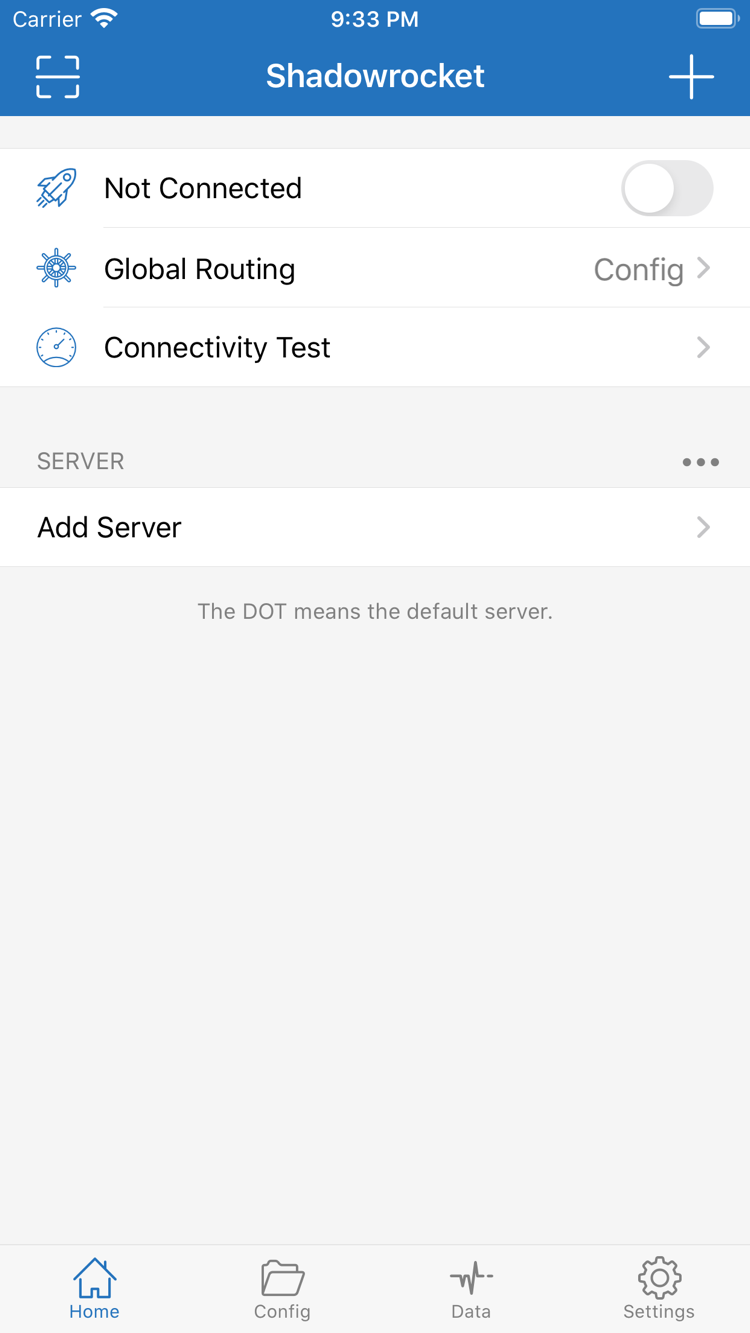
Return to Home and check two things in order: the intended entry is selected under SERVER, and Global Routing shows the mode you chose. A server name is only a note; it does not confirm that the protocol or parameters are correct. If several entries look similar, open their details to compare them, then return to Home and select the right one. Keep these two settings unchanged and turn on the connection switch at the top of the page.
The first time you connect, the system may ask to allow adding a VPN configuration. Confirm that the prompt appeared after you deliberately turned on the Shadowrocket switch, then follow the system steps to allow it and complete any required device authentication. This creates the system configuration needed for a connection on your device. It is not a subscription account login, and you do not need to enter a server password. If you dismissed the prompt, return to the app and turn on the switch again to check the authorization flow. There is no need to delete your existing server details first.
After authorization, return to the app and check whether the status at the top still says Not Connected and whether the switch remains on. If the switch turns back off immediately, first check the system configuration or conflicts with another VPN connection. If the switch stays on but web pages do not load, continue to the next step to check the server and routing. These symptoms require different checks. Repeatedly toggling the switch quickly makes it harder to observe what happens and identify the first failure in diagnostic records.
Reduce variables during the first connection test
For the first test, turn off other VPN connections currently running on the device and stick to one network, such as your current Wi-Fi. If you need to compare with a cellular network, note the current result first, then switch networks and test again. Do not change the network, server, and mode in the same attempt; even if access works afterward, you will not know which change made the difference.
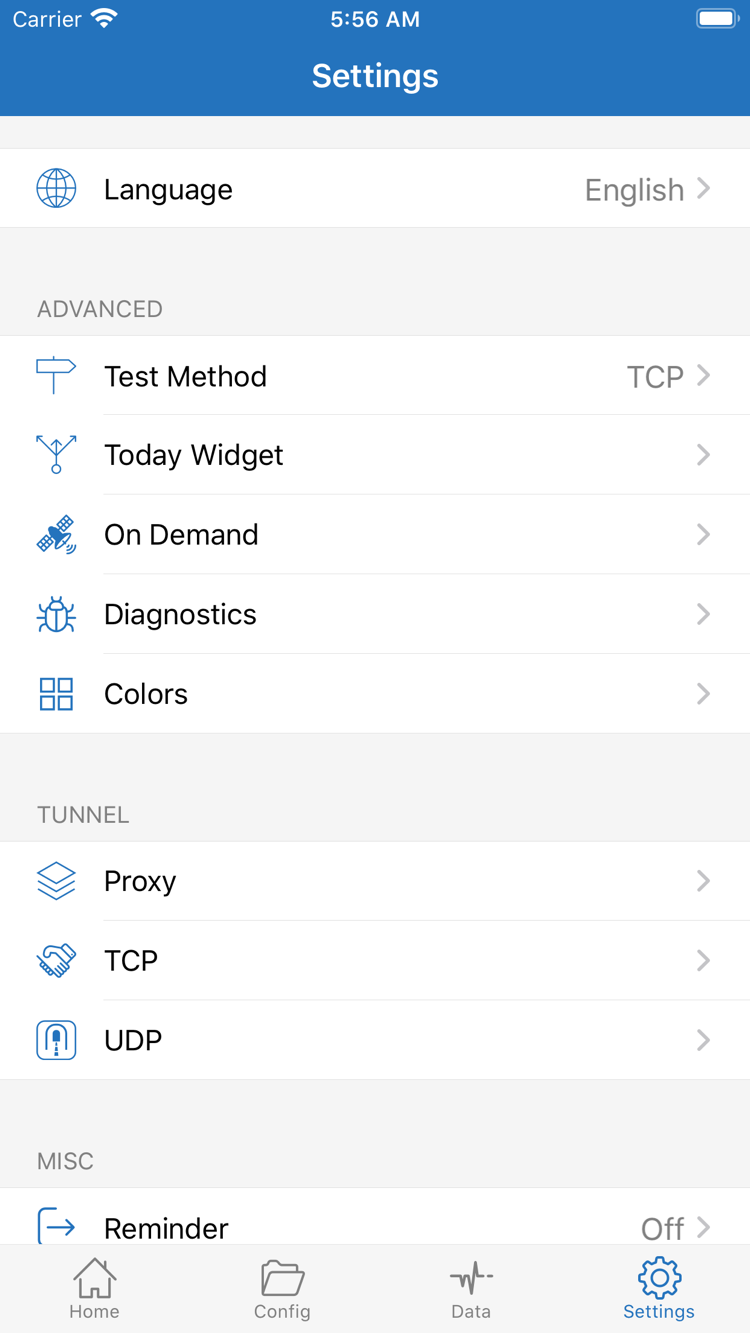
A system connection status or a switch that remains on only shows that the connection mechanism has started. It does not prove that every server in the subscription works or that every domain matches the expected rule. Do not change On Demand yet. First make manual connection work, then consider automatic connection conditions. Keep the current server and mode, and check the test result, actual access, and request path separately.
04 / VERIFY
Verify whether the connection works
Verification has two parts: whether the test completes and whether actual requests behave as expected. First, tap Connectivity Test on Home, wait for the test to finish, and check the result for the target entry. The test method, target, and current network all affect the result. A successful test is a reason to continue checking, not proof that every app is working; a failed test does not mean every server is unavailable.
Next, open a browser and visit a familiar page that you know should be handled by the current mode. Reload it or open a new page instead of checking content that may already be cached. With Config, also test a destination that should use a different policy according to your current rules. With Proxy, focus on actual access through the selected server. Do not use a page that only needs a local network connection as the sole proof that the proxy is working.
Compare the result with the policy
If actual access differs from what you expected, check the request log or diagnostic information provided by the app. Look for the request to the domain you just tested and confirm which policy it used. If it matched DIRECT, review the rules rather than changing server authentication first. If it matched PROXY and failed, continue by checking the server, transport, or resolution. Some apps reuse existing connections; after changing a configuration, make a new request so that an old connection is not mistaken for the result of the new configuration.
Record four brief details: current network, selected server, Global Routing mode, and actual access result. Once you have a repeatable result, restore the Config mode you use every day and test the same destination again. If the result changes after switching back to Config, continue checking the configuration and rule order. The main first-connection flow is now complete. Keep these details as a baseline for comparison if problems arise later.
Do not enable HTTPS Decryption, install extra certificates, or make broad DNS changes just to verify a connection. A normal import and connection does not require enabling every item on the configuration page. Change only settings directly related to the current symptoms. For complex resolution and rule-routing issues, continue with the troubleshooting manual.
05 / CHECK
Common failure points and what to check
When something fails, first identify where it stops: before import, after an entry appears but the connection fails, when the system switch will not stay on, or when only some requests fail after connecting. The following order covers common issues during first-time setup. After each check, repeat the same test as before. Move on only if it has not helped; do not change all settings at once.
Import fails or SERVER has no entries
Return to Add Server and check that Type matches your details. Use Subscribe for a subscription and enter individual server details according to the relevant protocol. Confirm that the subscription link is complete and still valid, and that it can be read on your current network. If the service returns a login page, information page, or error content, saving the link will not produce usable entries. When asking your own service provider to check the details, share only what is necessary and avoid exposing a complete link that contains credentials.
The switch works, but the server test fails
First check that the selected entry is the one you just imported. Then verify Host, Port, authentication details, Method, and TLS and transport parameters. Using the same protocol does not mean parameters are interchangeable. In particular, do not mechanically enter a password or encryption method for one type into another. Once you have confirmed the details, test again on another network without changing other settings. If only one entry in a subscription fails, narrow the issue to that entry first.
The switch turns off or reconnects automatically
If the switch turns off, first check that the system VPN configuration was authorized and that another connection is not competing for access. If it turns off and then reconnects automatically, open Settings and check On Demand and its conditions. If needed, temporarily turn the feature off and test manually. On Demand controls when to connect; it does not fix incorrect server parameters. First get a stable result with the manual switch, then restore automatic connection conditions one by one.
The test result differs from the browser result
Check Test Method in Settings to confirm which method the test uses. Do not directly compare results from different test methods as if they were equivalent. If the test completes but only certain domains are inaccessible, check which rules match in the current Config, domain resolution, and the destination service itself. Temporarily comparing with Proxy and then restoring the original mode can help distinguish a rule issue from a server issue, but it is not a substitute for checking the configuration.
For further checks, use Diagnostics and keep the necessary records from around the time the problem occurred. Before sharing records, remove subscription credentials, passwords, and personal network information. If the issue persists, follow the symptoms in Troubleshooting, or see the FAQ for subscription updates, configuration selection, and system permissions. This guide establishes a minimal working flow; it does not require adjusting every Proxy, TCP, or UDP setting.